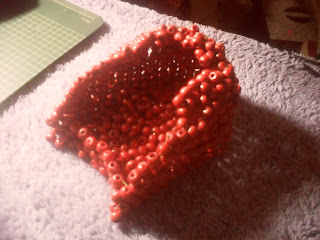
Want to make this little beauty over here on the left? Its purely done with beads and its not to be used in reality. Its actually only like an Ornament. Bead Shoes really can't be worn, haha if you want try, but don't blame me if they break suddenly =P
(There's a bunch of pictures of what i made at the end of the tutorial)
You can make heels, slippers, shoes, court shoes, flats any type you wish! But really i only made one shoe, because it was tough when beads were pasting on my fingers and wouldn't get off >.<
Oh and before i have posted a tutorial on how to make Table Mats with beads, check that out too, if you don't find the tutorial, search in the search tab just before my picture int he sidebar. This is something related 'coz its also done with beads! Don't get confused, i'm giving an idea to do with beads..try different stuff out, maybe you'll come up with something new too! (:
REMEMBER THERE's A VIDEO AT THE END with all the steps.. ;)
What to get :
1) Beads of any colors you choose depending on what you really want it to be like.
2) Multibond & a brush/ stick to apply it with. SHOULD BE SOMETHING THAT PASTES VERY WELL.
3) Depending on what you're making..decorations for them. I used some dry magenta petals bought from the store, a bow made with lace and ribbon of a goldish cream color, and a gold strap for the shoe cut from a slipper i don't use.
4) Cardboard & a black leather like paper. I got mine together cut out from a file book which my dad had. The point of this is, to make the top layer of the shoe look prettier and so when someone where's the bead shoe, they keep their leg on that black leather like paper+ cardboard. Its almost like what you see in shoes.
That's all!
Now let's try it..
How to start :
1) Start off by getting your beads and creating a base structure for your shoe. I will show you how to make the picture i have uploaded at the top. So your gonna have to have a base structure first for the front part of the shoe, which is a bump. Paste them with Multibond. So make a base for that. Like this,
Although i have actually done only that front part, it was because i thought i was going to make a heel, but hen while i was pasting the blue beads...i lost my focus and my thoughts wandered off while i was pasting them. Soo it became a flat =/ =P Anyhow you ca always make a full base if you think that's quite comfortable which i think would be a good idea rather than making that base after. (:
The beads should be in order and NOT pasted all over like the blue ones at the back -_- (They pasted accidently and dried and i got annoyed with it so yeah. Try to be very patient 'coz i'm not patient. =P )
2) Next Lift a bead layer more each time to take it higher like this,
WATCH THE VIDEO AT THE VERY BOTTOM OF THE TUTORIAL TO SEE A SLIDESHOW OF HOW I GLUED THE BEADS UP AS LAYERS. (:
And after that keep lifting a layer at a time using Multibond till you reach a level where you think you should bend the curve for the front.
3) This is the hardest part. When you come to the bend, start curving your beads and lessening them when you're arriving to the top. You will have to curve this bend so there will be space inside for you to put your toe in. Meaning that part will be empty. So apply some Multibond on the bead, tiny little bit and then paste a bead and go on like before. Remember they won't fall off because the glue i told you to use dries like in 1 second, trust me. So you don't even have to hold it so much but just Incase since it tends to fall down abit 'coz of the weight....lift it with your hand at times just so Incase it won't tumble down.
Make sure to get a proper bend just like you get in a shoe.
Be patient, beads always will paste in your hands..so let it dry abit and then try pasting again.
MORE IMAGES IN THE SLIDESHOW IN THE VIDEO! (:
4) Curve the bend you made to the base. Use the beads and paste them curving layer by layer to the shoe size and design. Its not really hard now at all but more like pasting bricks to build a wall, but make this wall alot thick because its a shoe not a wall =P
Use any colors you want, use your head and curve the beads with the colors you want slowly, don't mess it up!
5) Use the cardboard and black leather like paper you got now. Cut the cardboard in the size of the shoe inside. Like this, & then put a black paper on top of it and glue everything and glue it onto the shoe and hold it till it stick and pastes properly. The bend and the inside of the front shoe should be covered too. In the end it'll look like this =D
I didn't get a chance to take a picture after i put this big part inside. But all you have to do is paste that! (: inside. And then that's done!
6) That's all for the shoe making! =D Its not easy as the steps look i know, but this was my faviourite part. Don't mind if the shoe comes, one part small and one part big or whatever. Where there's lace and ribbons..there's always a cover up! ;)
Oh and in this step get the strap you got for this and paste it inbetween the cardboard and the beads so it won't show it's actually pasted ;) My gold strap was very tough so it didn't move at all...you should use one like that!
Use various cute things you can paste, such as ribbons, laces, more colorful beads, glitter..etc. (:
Here's my version :
Enjoy this video... ;) Its got all the steps and if its not clear, make it wide from the corner button.. ;) Its shown in different angles ;)
Video currently not available
Hope it came out right for you! Good luck!
Enjoy! xx
Kavi Sam.


.jpg)


